The Simple Putting Improvement System that Will Transform Your Poor Putting into Great Putting12/7/2014
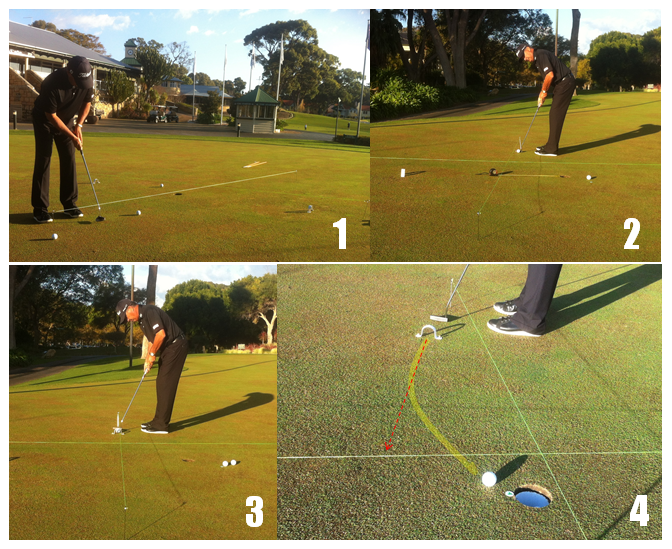
What is the main difference between someone we call a great putter and someone we call a poor putter? The obvious answer is that great putters appear to make more putts inside 10 feet, and they also don’t 3 putt as often as golfers who struggles on the greens. What’s interesting though is that many of those we call poor putters actually look like they should make a lot more putts than they do because they stroke their putts as well as anyone, and yet when it comes to producing consistently excellent putting results they are at the end of the line. The guys and gals on tour that can really putt hole plenty of important putts across sloping greens because they have developed the ability to read greens really well and they hole more than their fair share of tricky breaking putts. In our last articles we covered the first two putting abilities of; 1. Aiming your putter accurately 2. Hitting your putts where you aim consistently  Now we’re going to cover the last of the putting abilities; hitting your putts at the correct speed on the correct line consistently, so you can make more of the side-hill putts that you face. Great putters have developed excellent speed control across many different putting surfaces from Bent Grass to Bermuda grass and even on bumpy Poannua grass, and they have also learned to read these greens really well. There is no doubt that excellent speed control and reading sloping greens expertly gives you a big advantage in competitive golf. But which comes first in your opinion? a. Reading greens accurately b. Excellent speed control It’s an interesting question and an important one if you want to make more putts on sloping greens. At Pro Tour Golf College we share with our students that both are very important however to make more putts more often and also reduce 3 putt greens you must practice and develop your speed control first. 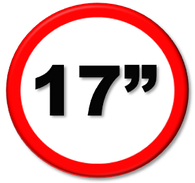 This will seem logical if you think about it because negotiating sloping surfaces with varying grass types and lengths from course to course requires that you control the speed of your golf ball to get your ball as near to the hole (or in the hole) as often as you can. Accuracy should be a secondary consideration on long putts where your goal should be to get your ball as close to the hole as you can to reduce the length of your second putt. So let’s take a look at simple and practical way to improve your speed control and green reading ability. Speed First and Line Second Some years ago noted short-game instructor and author Dave Pelz through his studies of professional golfers on the PGA Tour concluded that the optimum holing speed of a putt that misses a hole would travel no more than 17 inches or 43 centimetres past the hole. When Dave Pelz shared his advice with golfers it was actually very helpful for average through to expert golfers because it helped them to determine the break of a putt based on where the ball would finish if it didn’t go in the hole. 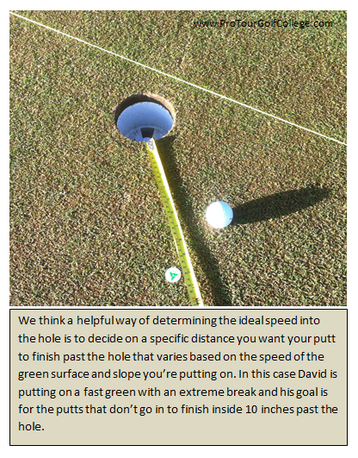 Click on the image to make it larger Click on the image to make it larger Today there are a number of different theories focused around the ideal speed a putt should go into the hole but from our point of view since every green you putt on will be different you need to decide on the ideal speed in each case and decide whether your ball will enter the hole by falling over the front edge or driving it into the back of the hole. The key to putting success on side hill putts is to match the speed of your putts to the break you have chosen. The slower you roll it the more it will break, and the faster you roll it the less it will break. Putting breaking putts successfully is a combination of experience, knowledge and of course skill. The skill in this case is mastering the first two abilities we discussed in our last article and combining it successfully with the third. The variable in the putting equation is always determining how much speed you need to roll your putt into the hole and no two golfers will do it the same way. Our 3 abilities putting system has so far helped you to aim your putter more accurately and also hit your putts where you aim, and in the third part of the system we'll determine where to aim your putt on a slippery slope to give you your best chance of making more of the putts you attempt inside 10 feet of the hole. The Simple System for Finding the Fall Line The first thing you need to do is find the North to South line as we call it or the fall line as it is also known and we use a simple plastic or paper plate that you can get at any supermarket and we draw lines from North to South and East to West on it and then we place the plate over a hole that we want to putt to. We then spin a golf ball around the circumference of the plate and when it settles at its low point we rotate the plate to find the North to South or the fall line (Picture 3). From here we place 4 alignments sticks down opposite the North-South-East and West points on the plate and once we have completed this step we stretch 2 - 12 foot (4 metre) string lines equidistant across the hole lining up with the N-S-E-W lines (Picture 6). 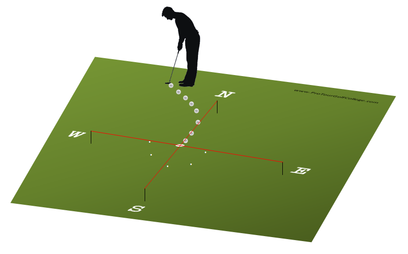 The Simple System for Practicing Breaking Putts Now that you have set up your North to South or fall line you are now able to determine with a fair degree of accuracy how much you ball will break from points around the hole. As I'm sure you know the North to South lines are your straight up and down putts (no break) and your East to West putts are the most extreme breaks of right to left and left to right. Practicing your side-hill putts is a relatively simple process once you have set up your string lines and using our side-hill practice system the benefits are that you will learn how to become very confident making the slippery side-hill putts simply because you make it hard to build compensation in your stroke because you will use the putting hoop you learned about in the last article to ensure that your putts go where you aim. The first step in the process is to determine the speed that you want the ball to go into the hole. In the 4 pictures above David is putting from 5 feet on the East to West line and the green is reading at 11 feet on the stimp so he decided that the ideal holing speed is no more than 10 inches beyond the hole. He places some ball markers at this distance to remind him about his speed (we call this the speed point) and now he has to work out what line he will start his putts on to make a high percentage of these putts. In picture 2 David has determined that 22 inches of break is required at the speed he has chosen and now he moves his East to West string to this 22 inch point (Picture 2). He works this out by hitting what we call test putts to determine the ideal line and speed and keeps adjusting the angle of the string line relative to its starting position. Now he has his break line sorted out he has to make sure that he hits his putts on this line and to do that he places a putting hoop about 8 inches in front of the ball. He does this because he wants to make sure that his putts always start where his putter is aiming.
Finally you can see in picture 4 that he removes the string line away and places a ball marker down on the edge of the cup where he wants the ball to enter the cup. You can see very clearly that his entry point is at 3 o'clock because this putt must enter the hole going very slow. To practice you hit sets of 5 or 10 putt sets and your goal is to make most of them, but when they miss the hole you want to make sure that they finish within your chosen speed point. You can repeat this exact process as many times as you need to from different points around the compass and you will discover in no time at all that your ability to hit your putts on the ideal line with the ideal speed will improve dramatically transforming you from a poor putter into a great one because you will be able to make a lot more of the putts that matter inside 10 feet. Lawrie Montague and David Milne - Pro Tour Golf College Your Success On Tour is Our Business Comments are closed.
|
Archives
June 2019
|
Proudly Supported By
Copyright © 2011 - 2018 Pro Tour Golf College
Website Managed By Golf Performance Media
All Rights Reserved
Website Managed By Golf Performance Media
All Rights Reserved





 RSS Feed


