

It’s no secret that to become a successful tournament professional you have to develop exceptional green-side and approach wedge skills. Consider for a moment how much of your golf is played from inside of 100 yards and you will very quickly realize that improving your wedge skills could be the single most important strategy for lowering your competitive score average. Have you noticed that when Tiger Woods, Phil Mickelson or indeed any professional golfer is in contention in tournaments how sharp their approach wedge and green-side wedge skills are?  When professional golfers are in form so is their scoring ability and the key to becoming a competitive amateur or in fact professional golfer is to practice your wedge skills. I'm sure that is can be argued that the weeks that professionals golfers are playing their best they’re in-fact holing more putts than usual. Yes they are, because they're hitting their shots closer to the hole! What is often overlooked is that the average wedge proximity to the hole for that week is closer, meaning that the probability of holing more putts is higher. Closer approach wedge proximity = more putts made = lower score In 2012 the proximity to the hole from inside 100 yards was between 12 and 17 feet from the hole for the PGA Tour golfers ranked from 1 to 100. Can you imagine if over 12 months the farthest you hit the ball from the hole was 17 feet when you were hitting approach wedge shots from inside 100 yards? From 10 to 15 feet PGA Tour pro’s ranked 1 to 100 make between 30 and 40 percent or 3 to 4 out of every 10 putts they attempt on average! So you could easily imagine that when they are in form they might hole another one or maybe two because they hit it even closer. So the bottom line is that you must learn how to hit your golf ball closer to the hole when you have a wedge in your hand. The closer you hit your approach wedge to the hole on average the higher your chances of making the putt. So how do you do it? What are the characteristics of an excellent wedge technique? Well for a start, great approach wedge golfers don’t gouge huge divots from the turf but instead create divots that go forwards more than they go down. Take a close look at your wedge divots when you hit an approach wedge shot from 75 to 100 yards and notice the depth of your divot and the direction of your divot. The divot should be relatively shallow; like say the depth of an iPhone 4, and one to two iPhones long depending on the type of turf you hit your shots from. Generally speaking softer turf grasses like bent grass usually produce longer divots compared to drier and coarser Bermuda type grasses of the south. 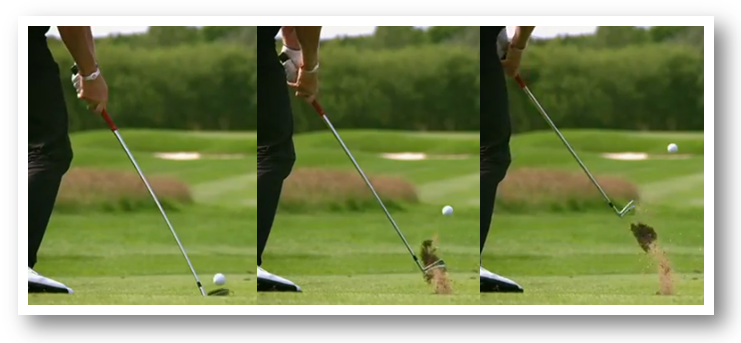
The direction of your approach wedge divot should be very slightly left as you look at it in relation to your target. This is because the golf club strikes the ball as it is travelling left (see above) so it creates a divot shape that can be thought of as straight-going left. The next time you go to a tournament where you can watch professionals hitting short irons into a par three hole take a good look at the divot shape and direction. You’ll be surprised how similar they all are. Approach Wedge Swing Model In this article I've chosen Billy Horschel (below) a fine young PGA Tour golfer who is coached by one of the top PGA golf instructors in the United States and the US PGA Teacher of the Year in 2010, Todd Anderson. Study this wonderful - simple wedge technique of Billy Horschel in slow motion and think about the elements that make his golf stroke seem so effortless. Regardless of your preferences for the style of golf swing technique you follow, it is hard to fault the quality of this one. In this article I'll be primarily focusing on the action of the golf club and not the body motion which we'll cover in another article. Personally what I like about Billy Horschel’s simple technique is that there is no wasted motion. What I mean is that he doesn't have any unstable elements between his arms-club and body that would influence inconsistency. Typically the unstable elements that we see in elite golf swings (especially approach wedge techniques) at Pro Tour Golf College are as follows; 1. Too much plane angle variability from backswing to impact 2. Too much up and down motion of the upper body 3. Too much sideways motion below the waist 4. Too much sideways motion above the waist 5. Arm swing out of sync with body motion All these unstable elements (and there are many more) are the effects of something going askew in the technique and are often interconnected. The technique behind building a great approach wedge stroke pattern is to control a number of the basic elements that influence direction plus consistent and solid contact. Approach Wedge Impact Geometry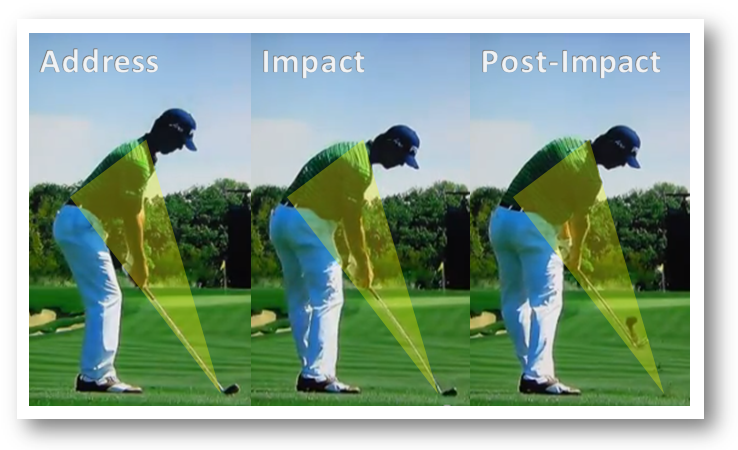
This will be easier to achieve from a great starting position. Notice how beautifully balanced and athletic Billy Horschel is in the address position. His arms are hanging freely down suspending the golf club underneath his shoulders ready to initiate the back-swing phase. One of the primary responsibilities of your golf instructor is to help you to set-up in such a way that the result is the creation of a sound golf swing technique. This is a great example of a set-up you should incorporate into you technique. Look at the three images of address, impact and post impact and notice how I've overlaid a translucent yellow triangle to highlight the function of the arms through the impact zone. Study those images carefully. The triangle extends from the base of the hosel (bottom of shaft) and along the golf shaft and into the lower part of the spine (lumbar region) and from there it travels up the back and into the top of the shoulders (base of cervical spine). There are only three points I want you to take away from this observation of Billy Horschel's approach wedge technique.
 3. Finally take note of the right arms relationship to the shaft from address to post impact. The angle between the shaft and right arm is maintained throughout this critical time in the stroke. The club-face angle is in-sync with the left wrist with no breakdown between the two. Often we find at this time in the stroke that the left wrist is in a bent condition and there is little to no angle left between the right arm and shaft. Post-Impact Drill One of the best practice drills you can use to build these alignments into your stroke is to rehearse the impact to post impact alignments as you see them here in the photos. Hold the finish and adjust your body angles and rotation until you can produce similar alignments. When you hit golf shots add the feel of the drill into your shot-making. This drill really helps you to build the three points into your technique. My final suggestion is that you do this with the help of your golf instructor at the beginning as he/she can interpret the alignments correctly and make-sure that you incorporate them successfully into your approach wedge swing. Approach Wedge Swing Plane Geometry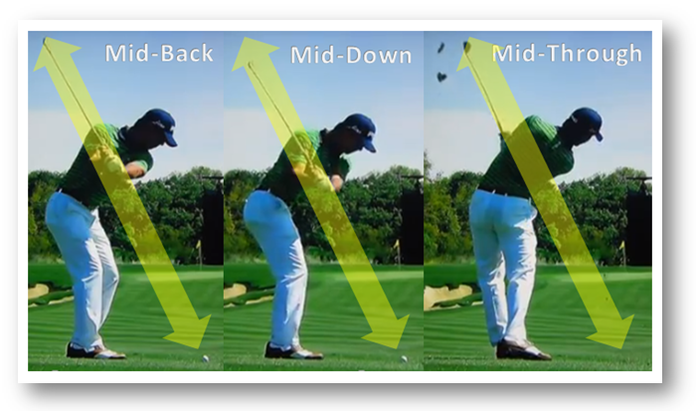
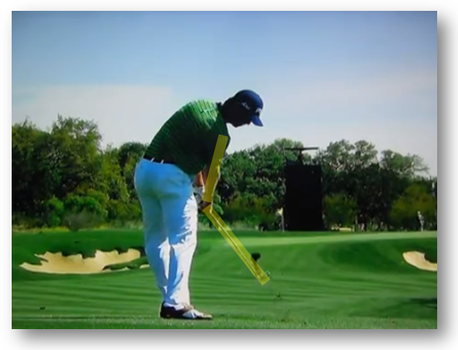
In the three photos above I've added a translucent arrow that describes the action of the golf shaft in relationship to the ball and the target. Notice that the three images describe; 1) The mid back-swing alignment 2) The mid down-swing alignment and 3) The mid follow-through alignment. The mid back-swing and down-swing alignments (Pictures 1 and 2) could almost be mistaken as being the same photo but they're not. What we are observing is real control over the direction of the golf shaft - a characteristic of great approach wedge golfers. Shaft plane control helps you to hit straighter approach wedge shots and generally speaking the more variation your have between the back-swing and down-swing plane angles, the more compensatory motions are required to achieve a sound and consistent impact condition. Yes there are exceptions to the rule but very few. Any time that the golf shaft is moving outside of the space between the right elbow and the top of the right shoulder (the width of the arrow) you will discover that your directional control will be harder to manage which makes it more difficult to be consistent. 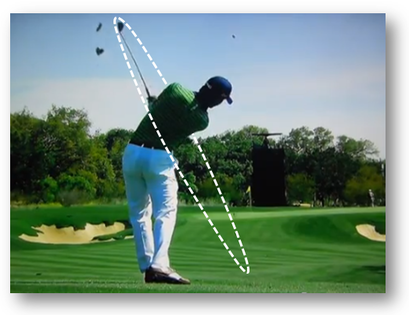 A great example of how plane angle control influences a successful release motion is by studying picture three in the mid follow-through phase. Billy Horschel has allowed the golf club to literally free-wheel itself through impact and into this condition. Look at the club-face angle how it has rotated very little by this time in the golf swing. This is where you will notice differences between tour golfers and higher handicapped amateur golfers. The release motion for a tour golfer is controlled through the action of the right arm straightening and the left wrist uncocking and rolling. The arm-swing and body rotation work together and the idea is to reduce or eliminate hand and forearm manipulation. Not that easy to do but that's essentially what top level teachers like Sean Foley is doing with his tour golfers. With an approach wedge stroke ideally there will be minimal left wrist roll (there will be a more with longer golf clubs) after follow-through when both arms are straight. As the club travels up the plane angle the shaft rotates enough to maintain the plane angle relationship it had in the mid back-swing condition. Swing-On-Plane Drill One of the best drills to practice is to swing the golf club as you see it in the three photos. Swing the wedge back to the top of your back-swing position and swing it down with the 'feel' that it is in the same plane going back and down and at the bottom of the swing turn your body with release of your swing and let the golf club 'free-wheel' back up the plane. The golf swing should never feel contrived or guided, but should simply be swung backwards and forwards with the primary focus being control of the direction of the shaft between the right elbow and top of the shoulder. I hope that you have enjoyed this article and that you have gained some new insights into control of the distance and direction of your approach wedge shots. An article like this can never fully explain what is going on in a tour golfers swing but hopefully you have acquired some useful information that will help you to gain a level of control over your approach wedge shots from inside 100 yards that leads to closer proximity to the hole and more putts made. Lawrie Montague and David Milne - Pro Tour Golf College Your Success On Tour is Our Business
Richard Sand
13/4/2013 02:49:48 pm
We have been looking for the time of start for your new program "Low Score Golfer: Elite Golfer Improvement System" 13/4/2013 03:11:17 pm
Thanks Richard, we plan to launch our new program the 2nd week of May. It has taken longer than we wanted but it will be worth it. Sorry for the delay and thanks for your patience. We`'ll let you know more about it in the next few weeks.
Richard
15/4/2013 09:16:02 am
OK, thanks. Comments are closed.
|

Archives
June 2019
|
 RSS Feed
Proudly Supported By

|

|
|
Copyright © 2011 - 2018 Pro Tour Golf College
Website Managed By Golf Performance Media
All Rights Reserved
Website Managed By Golf Performance Media
All Rights Reserved